In the tech world, change is the only constant. As a software engineer, I recently faced the challenge of moving a large database from MariaDB to Postgres within the AWS RDS environment.
This transition was prompted by a strategic decision from our platform team and management. They determined that, moving forward, we would standardise on Postgres, phasing out other database engines like MySQL and MariaDB by setting end-of-life (EOL) dates for them.
There is no doubt that this is a daunting task, but it is absolutely necessary.
Our application relies on a number of workers to process messages from (SQS) queues. These workers can be paused, allowing us to migrate the data without losing any information. The queued messages simply wait to be processed until after the migration is complete. However, keep in mind that this process may not always be so simple.
Our application is written in Python and uses SQLAlchemy for database interactions, with Alembic for database versioning. This setup gives us a solid foundation for making the switch.

In this article, I will share my experience with migrating a large database from MariaDB to Postgres within the AWS RDS environment by using PgLoader. I will walk you through each step of the migration process, highlighting potential issues you might encounter and how to resolve them.
Key steps in database migration
When it comes to migrating a database, having a clear and organised plan is essential. Below I have briefly described the steps I had to follow during this process.
In the next few sections, I will expand on each of these steps and present detailed insights on how to execute them effectively. You’ll learn about the tools and commands I used, the challenges I faced, and the solutions I discovered.
In my situation, the first step was to set up a new Postgres database. This acts as the destination for all the data that we will move from MariaDB.
Once the new database was ready, the next action was to pause the application workers. This is a crucial step because it prevents any changes to the database during the migration, ensuring that no data is lost or corrupted.
With the workers stopped and the database static, we could focus on recreating the database schema in Postgres (by using PgLoader). This means defining all the tables, columns, and data types to match our original MariaDB setup.
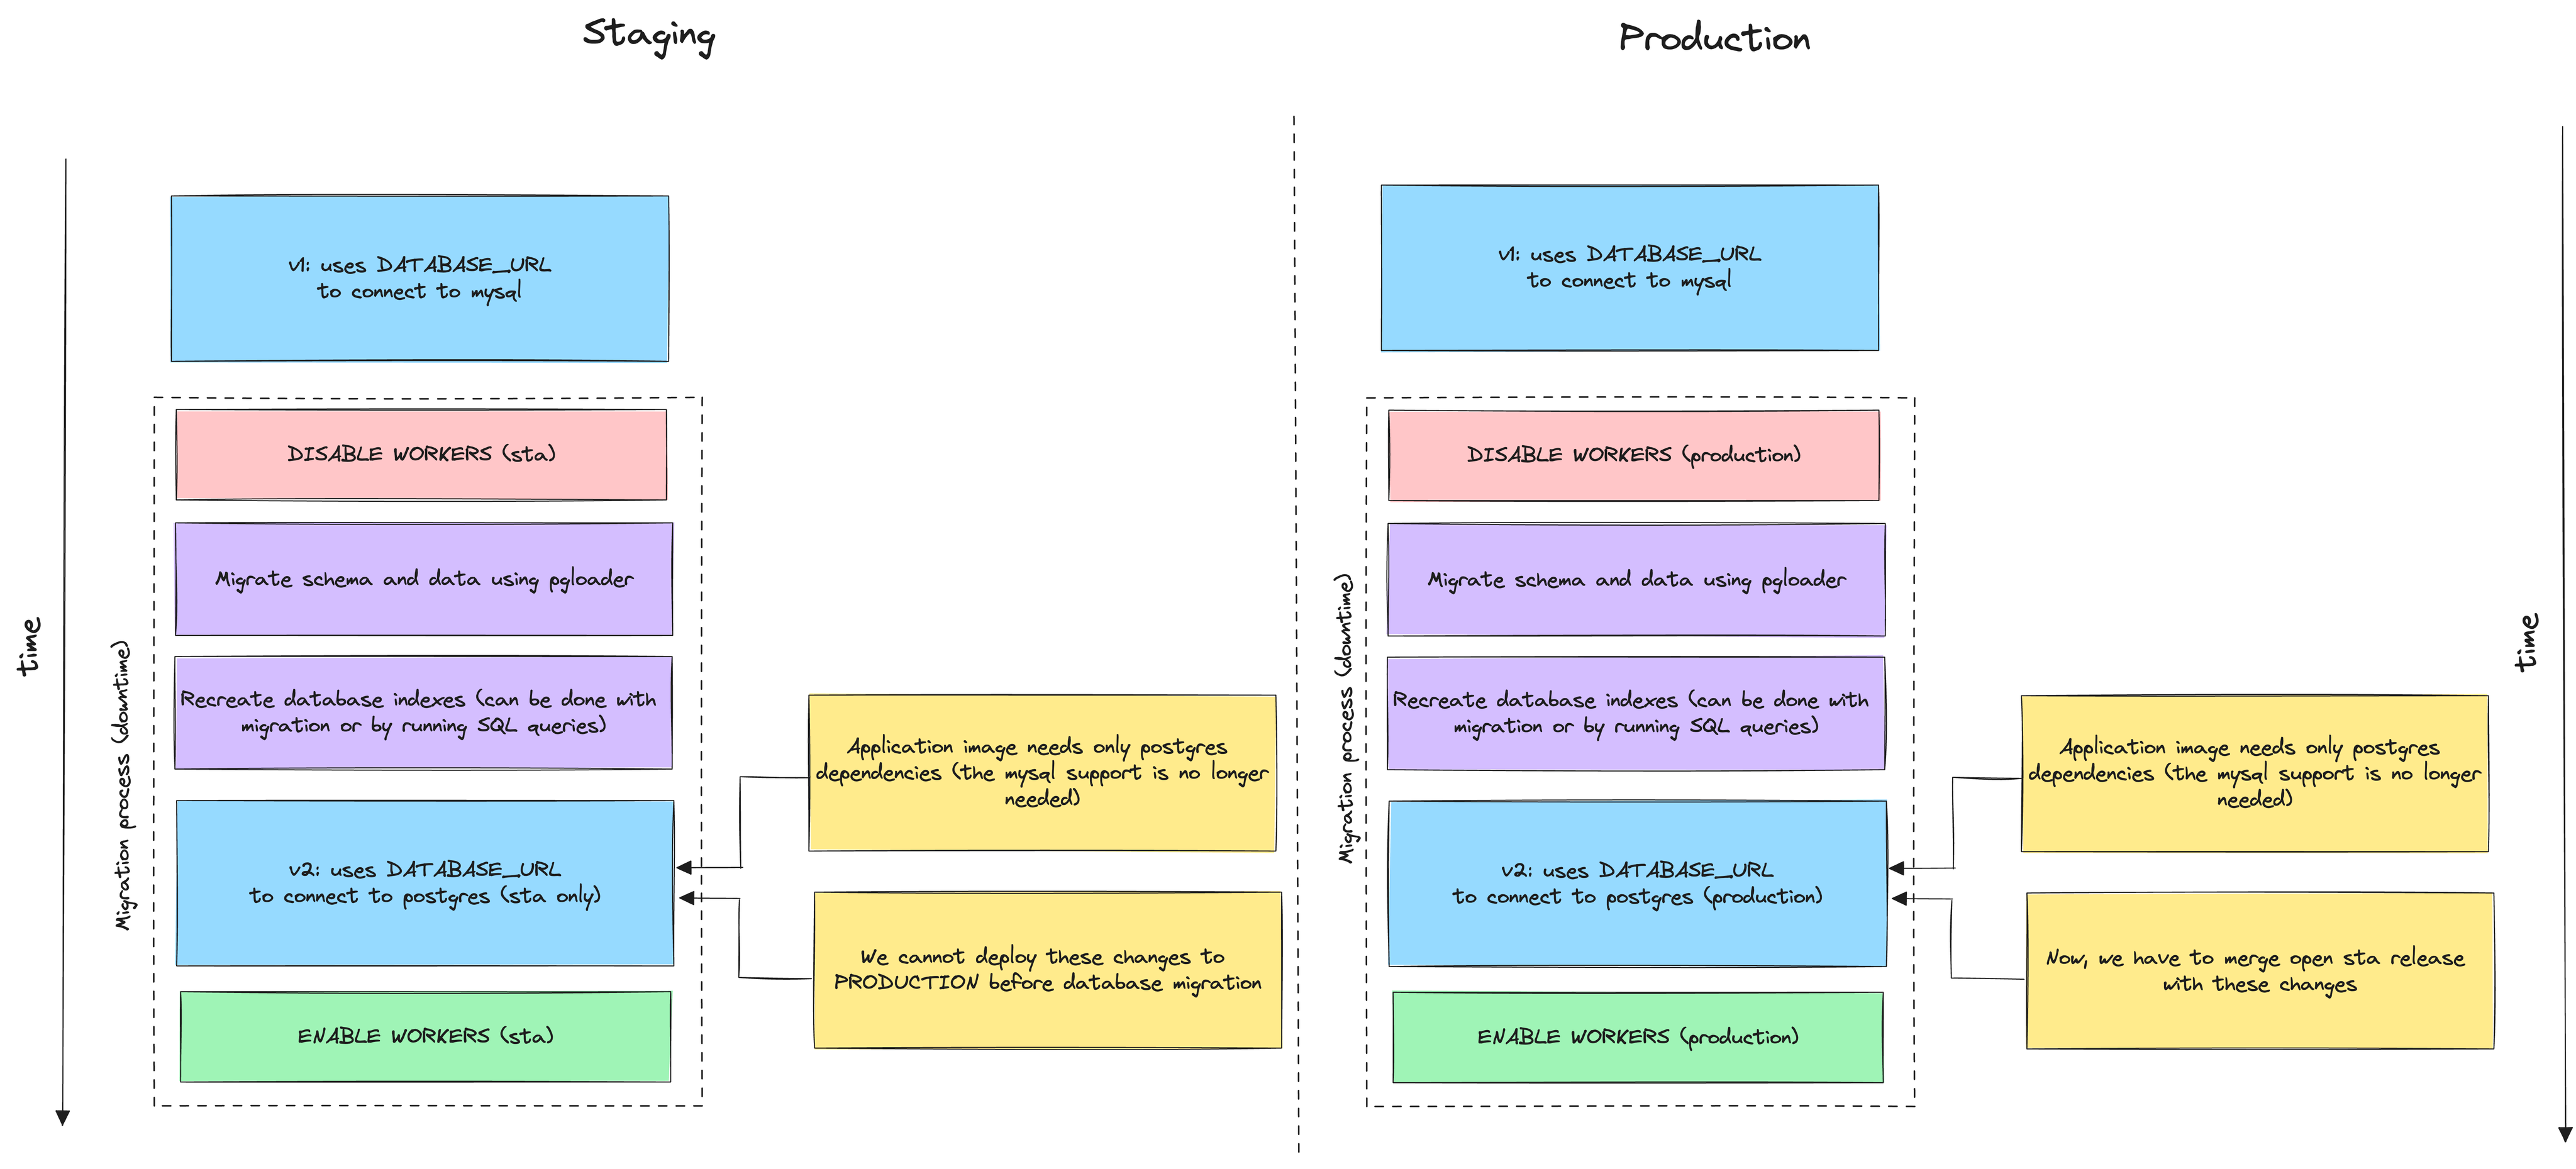
Figure 1: Database Migration Process
After the schema was in place, we moved onto the actual data migration, transferring all our information from MariaDB to Postgres. Following the data transfer, we needed to rebuild the indexes in Postgres to maintain performance and data retrieval speed.
Finally, once everything was set up correctly in Postgres, we restarted the application workers, but this time they were connected to the new Postgres database, completing the migration process.
Analyse the database
Before diving headfirst into a database migration, it’s critical to thoroughly analyze your existing database setup. This step is all about understanding the size and complexity of the data you’ll be moving. Begin by evaluating both your staging and production environments to get a sense of the volume of data involved. Look at the number of columns and rows in each table, as this will give you an indication of the migration’s scope.
Next, examine the structure of your database. Pay close attention to any unique or complex fields and indexes. Certain types of data and database features that work in MariaDB/MySQL might not have direct equivalents in Postgres, which can complicate the migration process. For instance, timestamp fields and functions like CURRENT_TIMESTAMP or NOW() might behave differently between the two databases.
In my case, although the tables were relatively straightforward, we encountered fields such as DATETIME with default values set to UTC NOW. In MariaDB, these were represented by CURRENT_TIMESTAMP, but Postgres handles these values differently, so adjustments were necessary.
What’s more, differences also exist in very simple numerical fields. In MariaDB and MySQL, you can have different sizes of integer numbers, like small or big ones, and you can choose if they can be negative or only positive (unsigned). But in Postgres, all integers can be negative or positive; there’s no option for just positive numbers. For more differences between MariaDB/MySQL and Postgres, check out this comparison.
Additionally, I had to deal with complex multi-field indexes that required careful consideration during the migration to ensure they were replicated correctly in Postgres. For this reason, I decided not to move the indexes automatically using PgLoader, but only to run the appropriate queries after moving the data (more on this later).
This means that in the first stage the database schema will be transferred (using PgLoader). Then all indexes will be recreated. Thanks to this division, we will also be able to check whether the data has been transferred correctly and only later create the indexes (which is a computationally expensive operation).
Check compatibility
Since our application uses SQLAlchemy, it was important to verify that it fully supported both MariaDB and Postgres. This ensures that once the data is migrated, your application’s interaction with the database remains functional and efficient. This can be easily verified locally using, for example, docker-compose and running two versions of the application with two database engines.
For Python applications, SQLAlchemy is a popular choice for ORM. It supports a wide range of databases, including MariaDB and Postgres. However, it’s important to note that SQLAlchemy doesn’t support all the features of each database.
For example, MariaDB has a feature called ON DUPLICATE KEY UPDATE, which allows you to update a row if it already exists in the database. This feature is not supported by Postgres, so you’ll need to find an alternative solution if your application relies on it. In my application I have to use INSERT ... ON CONFLICT ... DO UPDATE instead of ON DUPLICATE KEY UPDATE.
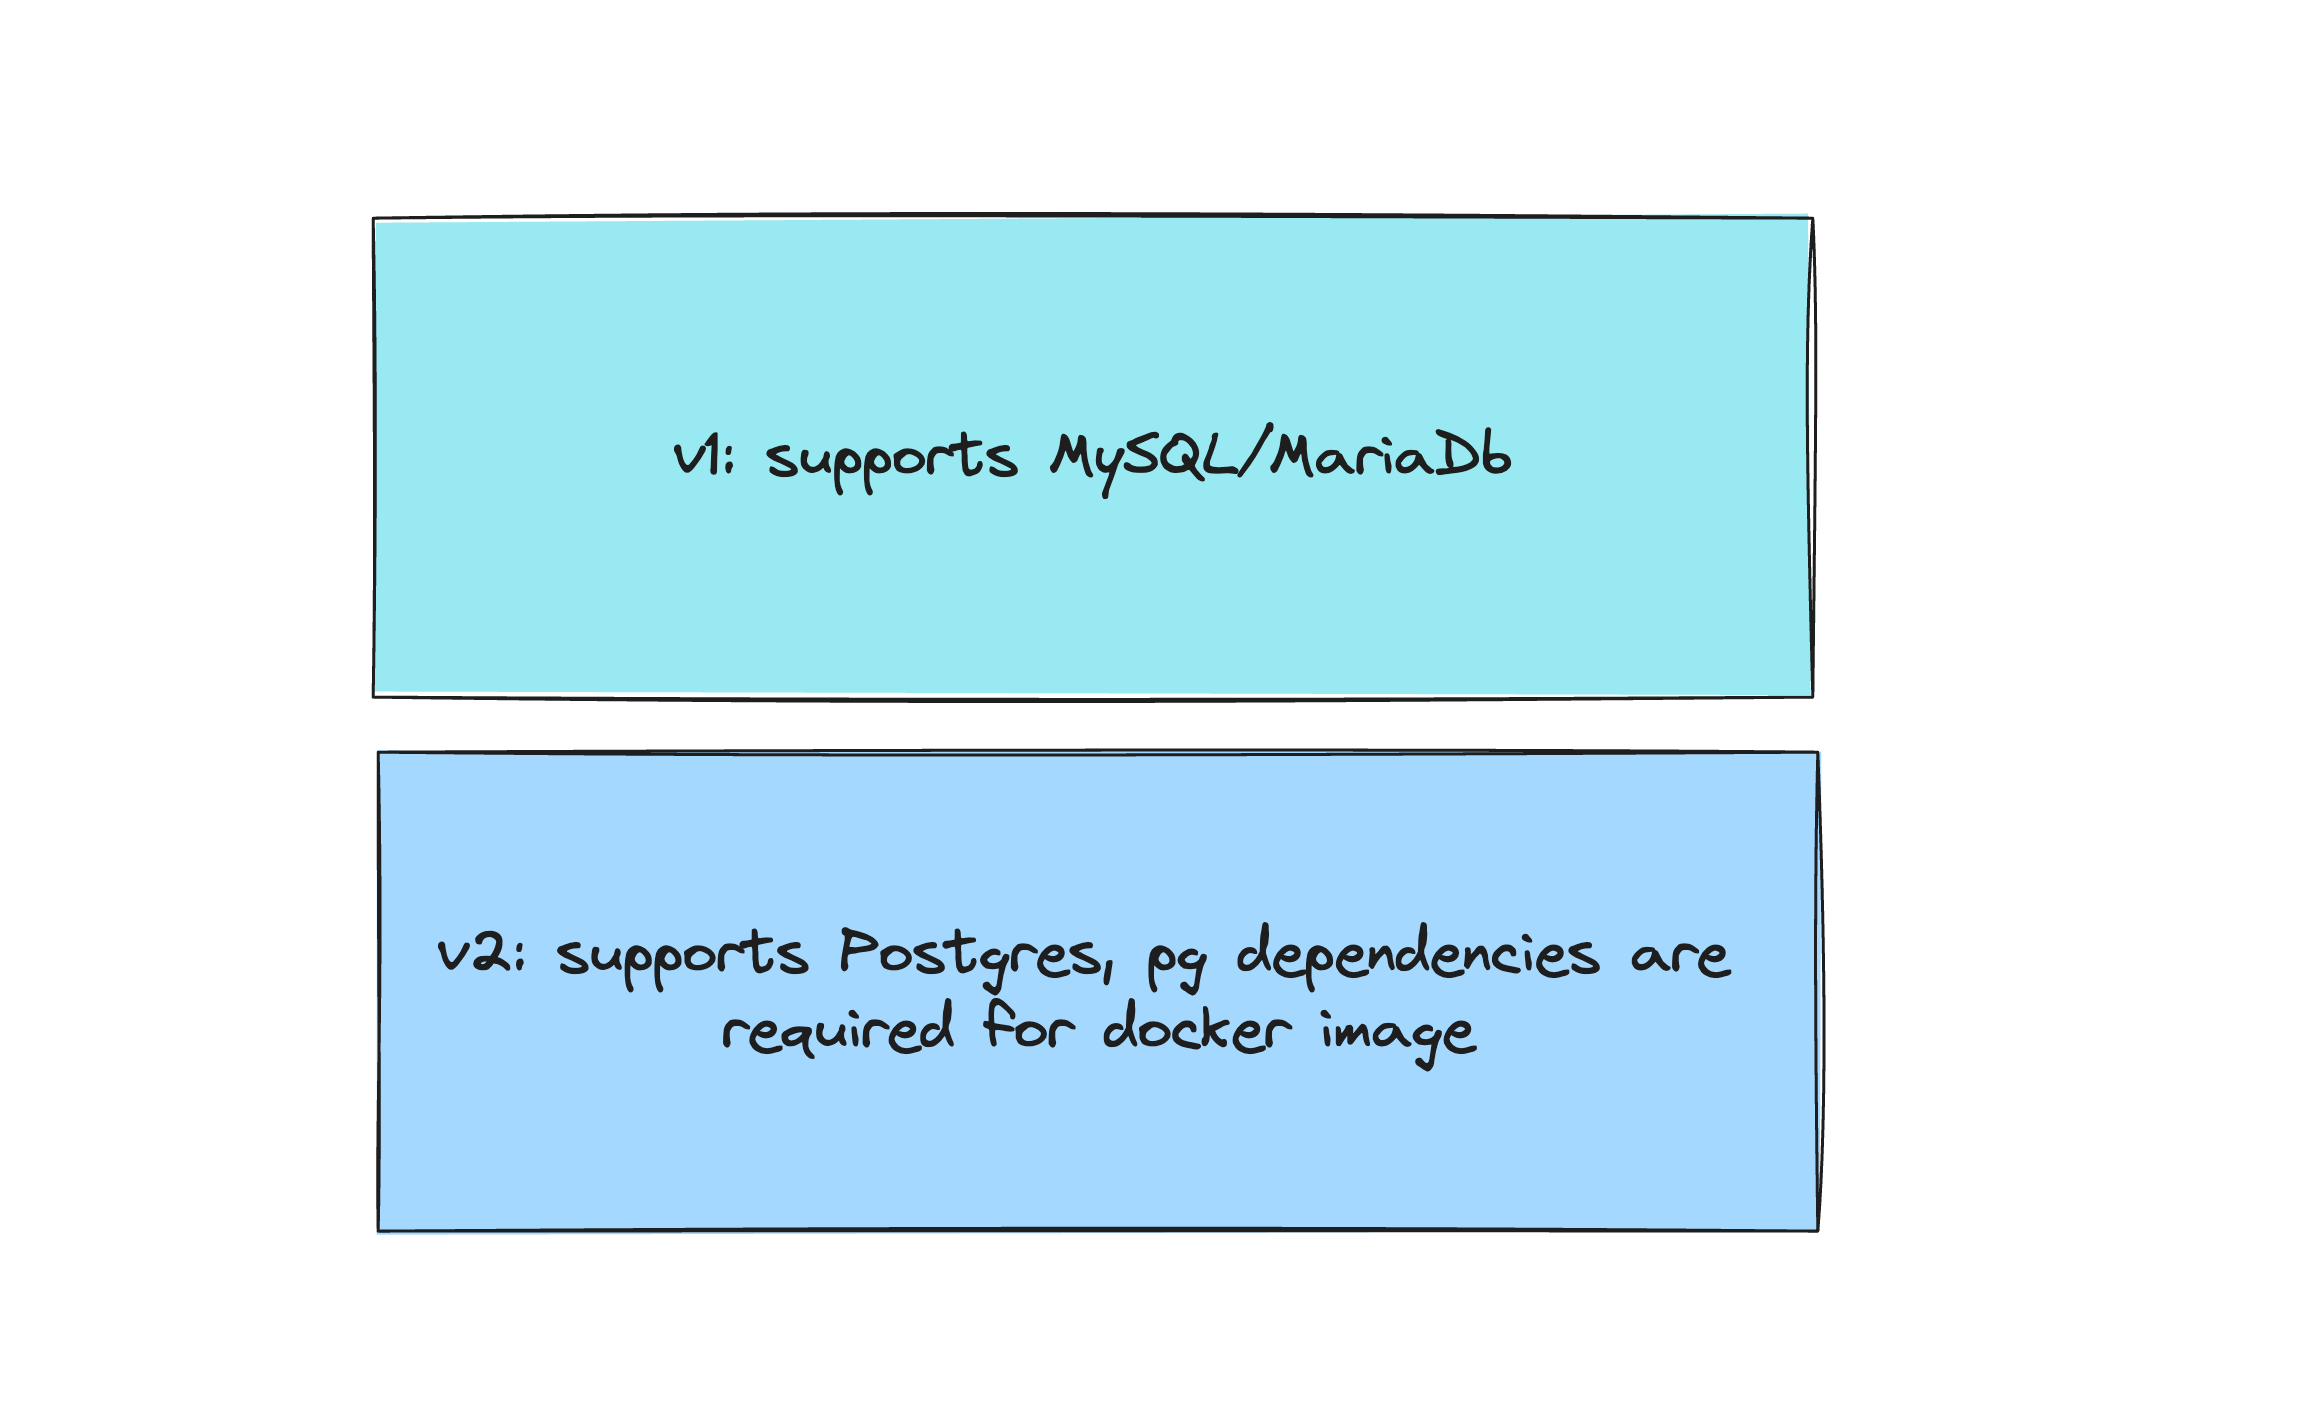
Figure 2: Two versions of the application (v1 and v2)
Nevertheless, in my case, SQLAlchemy correctly supported Postgres, so I didn’t have to make more changes to application code, except to adding the necessary dependencies to the application image in the docker (like psycopg2-binary). And this is how a version of the application that supports postgres (v2) was created.
If you change the database engine, make sure twice that all migrations (database versions) pass correctly on the new database, check that exceptions for the new database are handled correctly, and run compatibility tests.
Calculate downtime
When migrating a database, it’s important to consider the downtime that will be required. This is the period when your application is not running, and users cannot access it. The length of this downtime will depend on the size of your database and the complexity of the migration.
In my case, I was able to painlessly shut down the application and migrate the data, recreate the indexes, and then run it quietly with support for the new database.
Nevertheless, it required me to plan the downtime of the application and calculate its approximate time. I had to consider the time needed to migrate the data, recreate the indexes, and restart the application.
To do this, I prepared a data dump of the staging database, which contained about 10,000 records, which I loaded into a local MySQL database (created with docker-compose). And then I ran the PgLoader script to migrate the data and schema to Postgres.
table name     errors       read   imported      bytes      total time       read      write
---------------------------  ---------  ---------  ---------  ---------  --------------  ---------  ---------
            fetch meta data          0          3          3                     0.095s
             Create Schemas          0          0          0                     0.014s
           Create SQL Types          0          0          0                     0.004s
              Create tables          0          6          6                     0.056s
             Set Table OIDs          0          3          3                     0.009s
---------------------------  ---------  ---------  ---------  ---------  --------------  ---------  ---------
                 public.XXX          0      10000      10000   456.9 kB          0.364s     0.069s     0.014s
                 public.YYY          0      10000      10000   488.0 kB          0.312s     0.096s     0.016s
                 public.ZZZ          0          1          1     0.0 kB          0.230s     0.029s     0.000s
---------------------------  ---------  ---------  ---------  ---------  --------------  ---------  ---------
    COPY Threads Completion          0          8          8                     0.457s
            Reset Sequences          0          0          0                     0.251s
        Create Foreign Keys          0          0          0                     0.000s
            Create Triggers          0          0          0                     0.004s
           Install Comments          0          0          0                     0.000s
---------------------------  ---------  ---------  ---------  ---------  --------------  ---------  ---------
          Total import time          ✓      20001      20001   944.9 kB          0.712s
As you can see from the code snippet above, in my case PgLoader was able to load 10,000 records in 0.712 seconds! I later conducted similar experiments for samples of 100,000 records, and the execution time was ~10 times higher (more about the data and schema migration process itself below).
Of course, such an experiment is not authoritative, since my computer was running a very small database, and there were large RDS instances running on the AWS staging and production environment. However, this preliminary test gave me a rough estimate of the time required for each step of the process.
It’s essential to remember that the time taken to migrate a small sample may not scale linearly with the size of the actual production database. In a production environment, there are often more data and resources at play, which can affect the migration duration.
For a more accurate prediction, I considered factors like network speed, server performance, and the total volume of data. Additionally, I planned for extra time to handle any unforeseen complications that could arise during the migration. It’s always better to overestimate the downtime slightly than to underestimate it and risk extended outages.
In my case, the staging database had about 30 million records, and the production database had ~100 million. Taking these factors into account, I determined that the approximate downtime would be at most an hour, which I could afford, since the messages on the SQS queue could wait for their asynchronous processing later.
Schema and data migration
To migrate the schema and data I used PgLoader. Its primary function is to convert and load data from various sources, including MariaDB, into a Postgres database. It’s worth noting that PgLoader automates many of the tedious tasks associated with migration, such as data type transformations and schema recreation.
To get started with PgLoader, you should first set it up on your own computer. This way, you can try it out with a small part of your database or use a copy of it to make sure everything works well. You can install PgLoader easily using Docker or brew and than test it out.
While testing I created two databases (MariaDB and Postgres) using docker-compose and prepared the following migration_local.load file:
LOAD DATABASE
    FROM mysql://USER:PASS@HOST:3306/dbName
    INTO postgres://USER:PASS@HOST:5432/dbName

ALTER SCHEMA 'dbName' RENAME TO 'public';
and then I can run simple command:
pgloader --verbose --debug ./migration_local.load
the --verbose and --debug options are optional, but I decided to use them.
As you can see the migration_local.load consist two database connections stings, which determine the source and target database. Moreover, there is also a ALTER SCHEMA section, which is is crucial because it handles the renaming of your database schema from its original name in MariaDB to public in Postgres.
In MariaDB and MySQL, schemas are essentially the same as databases, and each database can have its own set of tables. In Postgres, however, the concept is slightly different. Postgres supports multiple schemas within a single database, and these schemas act like namespaces that contain the tables. The public schema is the default schema where tables are created if no specific schema is mentioned.
Unfortunately, in my case, I had to slightly modify the migration_local.load script because the INT fields from MariaDB were converted by PgLoader into BIGINT fields, which were not required in this application. I had to add the CAST clause from PgLoader, which is used to create custom value casting rules:
LOAD DATABASE
    FROM mysql://USER:PASS@HOST:3306/dbName
    INTO postgres://USER:PASS@HOST:5432/dbName

CAST type int when (= 11 precision) to "integer" drop typemod

ALTER SCHEMA 'dbName' RENAME TO 'public';
The drop typemod instruction tells PgLoader to remove any type modifiers from the column definitions when converting data types to Postgres. By specifying drop typemod, you’re instructing PgLoader to ignore and remove these type modifiers during the migration process. This ensures that the resulting Postgres schema only includes the core data types without any MariaDB-specific display width or other typemods that Postgres doesn’t support or need.
Moving on, I mentioned earlier that I don’t want to create indexes when migrating schema and data using PgLoader. Therefore, I needed to add another option WITH create no indexes. In addition, I added some other options such as choosing the number of workers, thus the resulting script looks like this:
LOAD DATABASE
    FROM mysql://USER:PASS@HOST:3306/dbName
    INTO postgres://USER:PASS@HOST:5432/dbName
WITH workers = 8, concurrency = 1, create no indexes, multiple readers per thread, rows per range = 10000

CAST type int when (= 11 precision) to "integer" drop typemod

ALTER SCHEMA 'dbName' RENAME TO 'public';
Perfect! But while testing on an AWS RDS instance (on a development environment), I found that one more little thing needed to be added: ?sslmode=allow. This is used to specify how the connection to the Postgres database should handle SSL (Secure Sockets Layer) encryption.
In the end, the whole script looks as follows:
LOAD DATABASE
    FROM mysql://USER:PASS@HOST:3306/dbName
    INTO postgres://USER:PASS@HOST:5432/dbName?sslmode=allow
WITH workers = 8, concurrency = 1, create no indexes, multiple readers per thread, rows per range = 10000

CAST type int when (= 11 precision) to "integer" drop typemod

ALTER SCHEMA 'dbName' RENAME TO 'public';
Migrate on staging and production
For the actual migration on staging or production environments, you’ll need to ensure that PgLoader has the necessary access to both the source (MariaDB) and the target (Postgres) databases.
This typically involves setting up secure connections to your AWS RDS instances, configuring the appropriate credentials, and granting PgLoader the required permissions to read from MariaDB and write to Postgres.
In my case, the migration was done from my local computer, for my own convenience. So I had to add the appropriate database access permissions and VPN. However, in other cases, you can perform this operation using a special machine or Kubernetes Pod.
To run the migration of the schema and data (first on the staging environment), I prepared the corresponding connection strings to both databases (MariaDB and Postgres). Then I ran the corresponding script, which was prepared according to the instructions described above.
The entire data migration took me about 5 minutes for the staging base and about 20 minutes for the production base. After everything was done in both cases, I ran a few SELECT queries to make sure the data had been migrated correctly and checked the database schema.
Recreate database indexes
In the next step, I had to recreate (re-build) the indexes in the database. To do this, I simply connected to the new database (Postgres) and executed some pre-prepared queries ALTER TABLE .... ADD CONSTRAINT ... PRIMARY KEY (for every table) and CREATE INDEX ... ON ....
Why did I have to create a PRIMARY KEY as well? PgLoader had create no indexes option enabled during data migration, since PRIMARY KEY is nothing but an index in Postgres, it was not created either.
When creating the indexes, I monitored using Grafana (linked to AWS CloudWatch) such metrics as CPU Utilization and Memory Usage for the new database. After the whole process, I made sure once again that everything was working properly by running a few simple queries.
Run the application
Once the data migration and index creation was over, I was able to launch a new version of the application (v2) that would use the new database. To do this, I built an image of the new application beforehand and launched it with the new ConfigMap at the appropriate time (the application was running in a Kubernetes cluster).
I also had the old database (MariaDB) and the previous version of the application (v1) available all the time, if something were to go wrong.
Fortunately, the application started correctly and correctly began to process more messages from the SQS queue. During this process, I monitored the logs of the application and the Rollbar connected to the application.
Conclusion
In my case, the entire database migration procedure for both the staging and production environments took less than 45 minutes, because I could afford to downtime the application and check quietly that everything was working properly.
It’s essential to acknowledge that my situation was relatively unique and straight forward. Many real-world scenarios don’t allow even a short downtime, especially in high-availability production environments where every minute of inactivity can have a major impact on the business. Those cases might need a more complex migration strategy, like using replication to sync data in real-time until the cutover.
Regardless of the approach, careful planning, thorough testing, and a deep understanding of both the source and target database systems are crucial for a successful migration.
Tools like PgLoader can greatly simplify the process, but they are just one piece of the puzzle. Continuous monitoring, prepared rollback plans, and proactive communication with stakeholders are equally important to ensure a smooth transition.
I hope my case-study will help you in the future when planning your database migration process to Postgres!