In this blog post, you’ll learn about the basics of using Python workers for processing messages from SQS queues. We’ll cover the benefits of using workers, including improved performance and scalability. We’ll also discuss some of the drawbacks, such as the added complexity of managing multiple processes. Additionally, we’ll provide best practices for implementing workers in your code, including tips for optimizing their use. Whether you’re new to multiprocessing or an experienced developer, this post will provide valuable insights and tips for using Python workers effectively in your projects.
Introduction
What is message-driven architecture?
Message-driven architecture involves the use of message queues to send and receive messages between different parts of the system. In this approach, components of the system send messages to the queue, and other components receive and process the messages as they are received. This allows for decoupling between the producers and consumers of messages, making it easier to scale the system and manage its complexity.
One of the main benefits of message-driven architecture is that it allows for asynchronous communication between different components of the system. This means that producers of messages can send messages to the queue without having to wait for a response from the consumers, and consumers can process messages at their own pace.
What are workers?
Workers are processes that perform tasks in the background. They’re often used to perform computationally intensive tasks that would otherwise block the main thread. Workers are also useful for performing tasks that require a lot of memory, such as image processing. Workers are often used in conjunction with a message queue, which allows them to communicate with the main thread. Workers are typically implemented using the multiprocessing module, which provides a high-level API for creating and managing processes.
Why use workers?
There are several reasons why you might want to use workers in your Python code:
- Improved performance: By using workers to perform tasks in parallel.
- Improved scalability: Workers allow you to scale your application’s capabilities as needed by adding more worker processes (horizontal scaling). This can be useful for applications that need to handle a large number of tasks concurrently.
- Isolation: Workers provide a level of isolation between different tasks, which can be useful for tasks that might interfere with each other or that have different resource requirements.
Of course, there are also some drawbacks to using workers, such as the added complexity of managing multiple processes and the overhead of creating and communicating with worker processes. It’s important to carefully consider whether the benefits of using workers outweigh these drawbacks in your specific use case.
In this blog post I want to show you how to use workers in Python. We’ll start by looking at a simple example of a worker that performs a simple task based on messages received from a message queue.
Workers with message queues
Message queues allow you to decouple the producers of tasks from the workers that perform them, making it easy to add more workers as needed to handle the workload. This can be especially useful for applications that need to handle a large number of tasks concurrently.
In this section, we’ll look at a simple example of a worker that performs a simple task based on messages received from a message queue. Architecture of this example is shown below:
 Figure 1: Basic message queue architecture with workers
In this example, we have a single producer that sends messages to a message queue. The messages contain a task payload. The workers receive messages from the queue and performs the tasks based on the payload. Most of the queue engines block the message immediately after reading it (to prevent multiple consumers from processing the same message simultaneously). For example AWS SQS uses a “visibility timeout”
Immediately after the component receives the message, the message is still in the queue. However, you don’t want other components in the system receiving and processing the message again. Therefore, Amazon SQS blocks them with a visibility timeout, which is a period of time during which Amazon SQS prevents other consuming components from receiving and processing that message.
After a message is received by a consumer, it remains in the queue but is “invisible” to other consumers for the duration of the visibility timeout. This allows the consumer to process the message and then delete it from the queue when it is finished. If the consumer is unable to process the message within the visibility timeout, the message becomes visible to other consumers again and can be processed by another worker. This helps to ensure that messages are processed exactly once, even if multiple workers are receiving messages from the queue in parallel.
This means your workers can safely scale horizontally and run in parallel. The producer can send as many messages as it wants, and the workers will process them as they are received. This is a very simple example, but it illustrates the basic idea of how message queues and workers can be used together to improve the performance and scalability of your application.
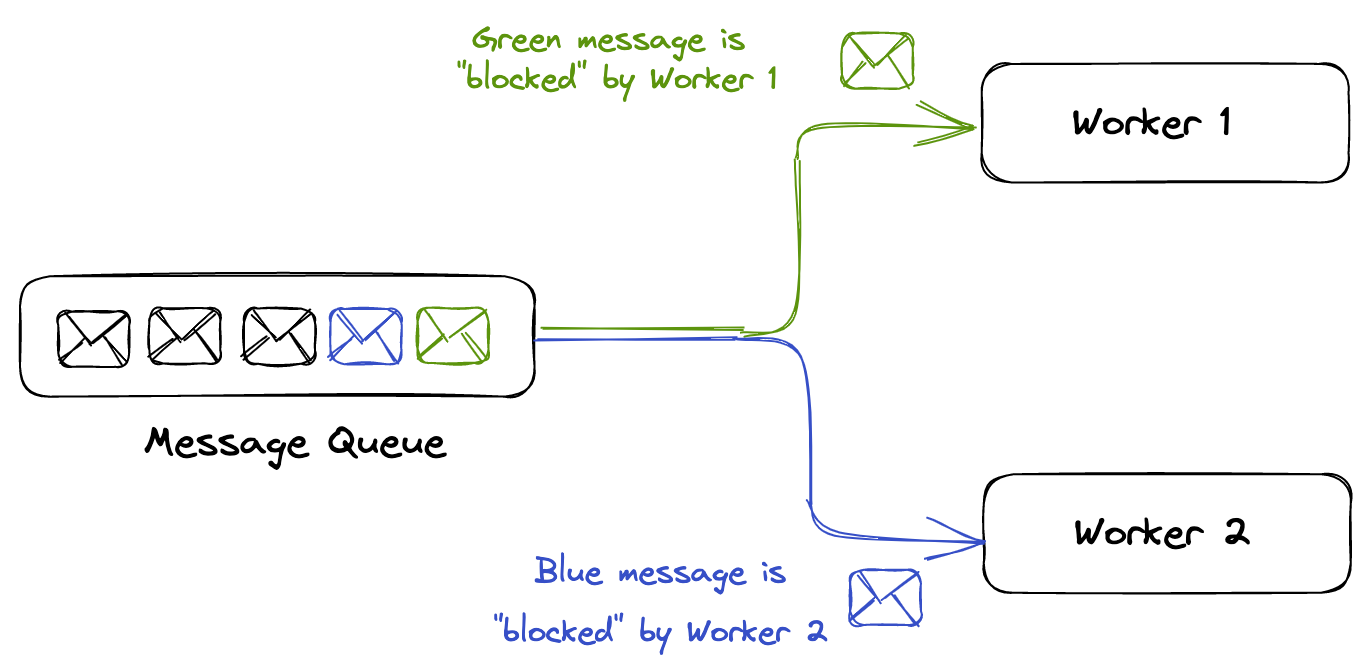 Figure 2: Blocking messages in queue
The interface for working with message queues may vary depending on which specific queue implementation you are using. However, in most cases, you will need to take explicit action to remove a message from the queue after it has been read and processed. If you fail to remove the message, it will typically be placed back in the queue and processed again. To avoid this situation, it is important to make sure that you properly handle the removal of messages from the queue after they have been processed.
Deadletter queues
Deadletter queue is a queue that you can use to store messages that cannot be processed by your workers. This can be useful if you have a worker that is unable to process certain types of messages, or if a message has been retried too many times and is still unable to be processed.
Once you have set up the dead-letter queue, you can configure your primary queue to send messages to the dead-letter queue under certain conditions. For example, you can specify that a message should be sent to the dead-letter queue if it has been retried a certain number of times and is still unable to be processed.
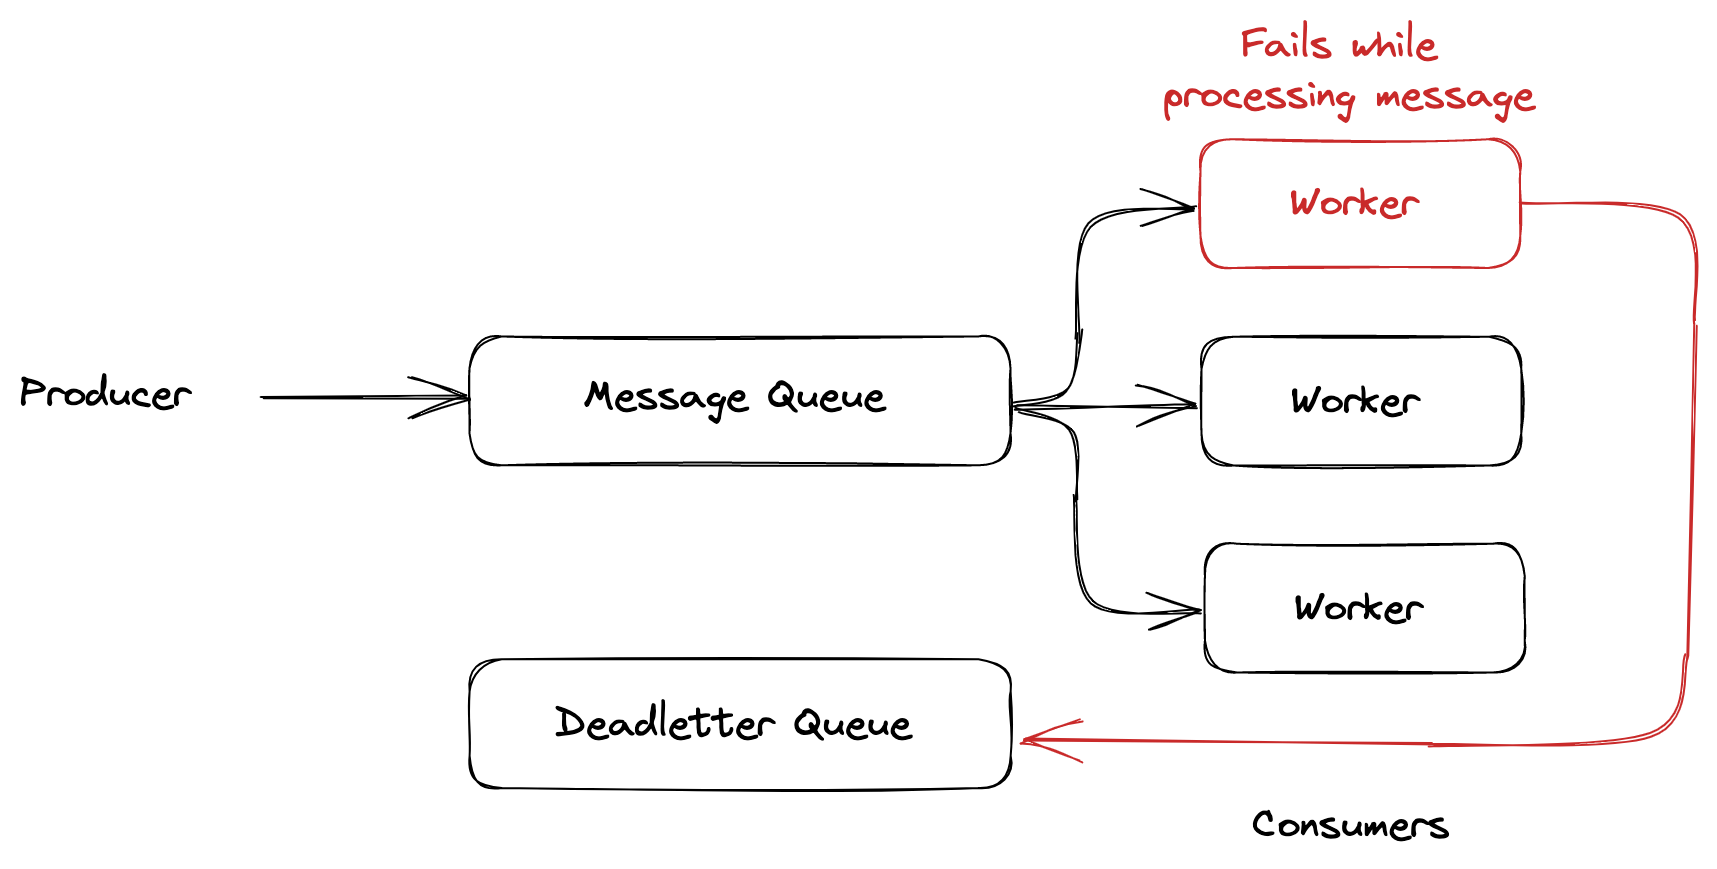 Figure 3: Example of using deadletter queue
So if your processing worker fails to process a message, it will be sent to the dead-letter queue. You can then use a separate worker to process the messages in the dead-letter queue. This allows you to isolate the messages that are causing problems and process them separately from the rest of the messages in the queue. Then you can fix the problem and reprocess the messages in the dead-letter queue.
Queue Gateway
First, we need to create a gateway for our queue. In this example, we’ll use SQS from AWS and boto3 library to communicate with SQS. The gateway will be responsible for creating a connection to the queue and receiving messages. The gateway will also be responsible for removing messages from the queue after they have been processed.
import boto3
from mypy_boto3_sqs.service_resource import Message


class QueueGateway:
    def __init__(self) -> None:
        self._queue = boto3.resource("sqs").get_queue_by_name(QueueName=QUEUE_NAME)

    def get_messages(self) -> list[Message]:
        return self._queue.receive_messages(MaxNumberOfMessages=10)

    @staticmethod
    def delete_message(message: Message) -> None:
        message.delete()
boto3 interface is not the best, but it’s the easiest way to communicate with SQS. The get_messages method will return a list of messages from the queue. The delete_message method will remove the message from the queue. Please note that maximum number of messages that can be received at once is 10, if you want to receive more messages you need to call get_messages method multiple times or use while loop.
Worker
Our worker will be responsible for processing messages from the queue. The worker will be responsible for receiving messages from the queue, processing them and delete message from the queue if the processing was successful. The worker will also be responsible for sending a response message to the queue if the processing was successful.
More over due to autoscaling requirements we need to be able to stop the worker. To do that we will use SIGTERM/SIGINT signal. The worker will be responsible for handling this signal and stop the worker gracefully.
import logging
import signal
import types

from threading import Event

logger = logging.getLogger(__name__)


class Worker:
    def __init__(self) -> None:
        self._queue = QueueGateway()
        self._exit_event = Event()
        self._init_signal_handlers()

    def run(self) -> None:
        while not self._exit_event.is_set():
            messages = self._queue.get_messages()
            for message in messages:
                # you can add additional sentinel to break the loop if sigterm/sigint was received
                if self._exit_event.is_set():
                    break
                self._process_message(message)
                self._queue_gateway.delete_message(message)
            self._sleep_between_runs()

    def _process_message(self, message: Message) -> None:
        logger.info(f"Processing message: {message.body}")
        # do some processing
        logger.info(f"Message processed: {message.body}")

    def _sleep_between_runs(self) -> None:
        # wait for a while between runs
        # using Event().wait() to be able to stop the worker whenever we want using signals
        self._exit_event.wait(1)

    def _init_signal_handlers(self) -> None:
        signal.signal(signal.SIGINT, self._signal_handler)  # type: ignore[arg-type]
        signal.signal(signal.SIGTERM, self._signal_handler)  # type: ignore[arg-type]

    def _signal_handler(self, signum: signal.Signals, _: types.FrameType) -> None:  # pragma: no cover
        logger.info(f"Got signal: {signum}. Exiting gracefully")
        self._exit_event.set()
In this implementation, we are using the Event class from the threading module to allow us to stop the worker at any time by sending a signal. When the signal handler calls self._exit_event.set(), the main thread’s wait() call will immediately be interrupted (you can read more about this here).
The run method of the worker is responsible for reading messages from the queue, processing them, and deleting the message from the queue if the processing was successful. This allows us to communicate with the worker and track the progress of tasks being performed.
Autoscaling
Our worker is ready, but we need to be able to run multiple workers at the same time. You can use any autoscaling solution you want. I will only sketch the idea of how it can be done.
The goal of this implementation is to use a message queue as a source for an autoscaling solution. The autoscaling solution will monitor the message queue and start or stop workers based on the number of messages in the queue. This allows you to scale the number of workers up or down based on the workload, improving the efficiency and performance of your application.
 Figure 4: Autoscaling workers
You can create scaling policies that determine how many workers should be started or stopped based on the number of messages in the queue. For example, you might create a policy that starts one worker for every 10 messages in the queue, or that stops all workers when there are no messages in the queue. By carefully designing these policies, you can ensure that your application has the right number of workers to handle the current workload efficiently.
Conclusion
In conclusion, Python workers are a useful tool for improving the performance and scalability of your applications. Workers can also be used in conjunction with message queues to decouple the producers of tasks from the workers that perform them, making it easy to scale the number of workers up or down based on the workload.
However, it is important to carefully consider the benefits and drawbacks of using workers and to follow best practices when implementing them in your code. This blog post provided an overview of the basics of using Python workers with message queues and highlighted some key considerations for working with them effectively.